
In this activity, we were focusing on how the unit circle and the special right triangles relate to one another when one fills out the unit circle. Once you know the special right triangles and their side values, you are able to find the coordinates for the unit circle.
1. 30* Triangle
This triangle contains an adjacent side (x), opposite (y), and hypotenuse. On the picture given to the right, the values of each side of the triangle are given. These are the values when it is used to classify a special 30* triangle. On the picture below the first, we are able to see how the values change when it is on a unit circle. To receive these values, you just basically have to divide all the regular values of the special right triangle by two. Since the x value of the unit circle is radical 3 over 2, that becomes your x coordinate while the height is 1/2 making it your y coordinate. The coterminal angles for 30* are 150*, 210*, and 330* .

2. 45* Triangle

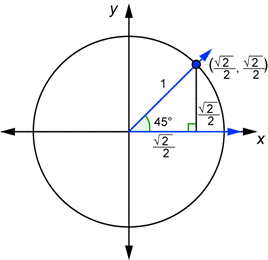 A 45* triangle involves having 2 side lengths that are the same length. These two sides can be 1 or just the variable x. The hypotenuse for the special right triangle is radical 2. However, for a unit circle, we want the hypotenuse to equal 1. Therefore, we must divide the side lengths by radical 2 on every single side. Once we work that out, we are able to get the values of both x and y which are radical 2 over 2. To put these into our coordinate plane, we know what the values of x and y are so we just make or coordinate (radical 2 over 2, radical 2 over 2) The coterminal angles for a 45* angle are 135*, 225*, and 315*.
 http://images.books24x7.com/bookimages/id_15618/fig441_02.jpg
http://www.montereyinstitute.org/courses/DevelopmentalMath/COURSE_TEXT2_RESOURCE/U19_L1_T3_text_final_3_files/image022.gif
3. 60* Triangle


4. This activity helped me derive the unit circle because as long as you learn the first quadrant based on the special right triangles on the unit circle, you know how to fill out the rest of the quadrants. Since we know what the values and coordinates for each reference angle is, we know where to fill in the blank for the unit circle. As long as you know the first quadrant, you able to know the rest of the quadrants because they are basically the same thing!
5. The triangle drawn in this activity lies on the first quadrant. Once you start moving the different quadrants, the signs for the coordinates start to change. For example, if we fill out the unit circle for the quadrant II, we notice that the x- coordinate becomes negative while the y- coordinate stays positive.

As you can see above the only thing that seems to change is the signs of the coordinates. This makes sense because if you are on quadrant I, the coordinates will both be positive. On the second quadrant, the x- coordinate will be negative while the y- coordinate will be positive. On quadrant III, both the x and y coordinates will be negative. Finally, on the fourth quadrant, the x- coordinate will be positive while the y-coordinate will be negative.
Inquiry Activity Reflection:
The coolest thing I learned from this activity was that to derive the unit circle, you do not have to memorize the whole unit circle. As long as you know the first quadrant, you know how to fill in everything else.
This activity will help in this unit because I will be able to fill in the unit circle more rapidly during the test as well as help while I am doing concepts 8 and 9 so that I can check my work.
Something I never realized before about special right triangles and the unit circle is that both these two concepts are completely alike. The unit circle is made of special right triangles which allows us to know where the coordinate are derived from.

